
Scribe Web documents can carry a primary recipient and one or more CC recipients, shown in the To and CC fields at the top of the document editor.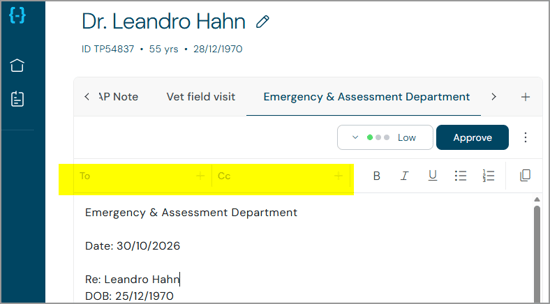
The To and CC fields are only active when all of the following apply to the blueprint used for the document:
- It is an Organisation blueprint, not a Personal blueprint.
- The blueprint has a workflow trigger enabled.
- The blueprint has an integration configured.
- The matching blueprint on the T-Pro platform has default recipients set.
- The user's author group has access to the blueprint.
=> If any of these conditions isn't met, the To and CC fields are shown greyed out and can't be used. This is expected behaviour, not a fault.
View assigned recipients
When a document is generated from a blueprint with default recipients, these are shown automatically:
- The primary recipient appears in the To field, by name only.
- CC recipients appear in the CC field: the first CC recipient is shown by name, followed by a count of any further CC recipients. The count updates automatically as CC recipients are added or removed.
- If a recipient's name is too long for the field, it's truncated with an ellipsis; the layout of the document header doesn't shift.
- To remove a recipient directly from the field, click the X next to their name.
=> If no recipients are pre-selected, the To and CC fields are shown empty with the option to add a recipient. Use the + icon.
Select or change recipients
- Click the To field, or anywhere in the CC area.
=> The recipient selector opens: on the Primary recipient tab when opened from the To field, or the Cc recipients tab when opened from the CC area. Any recipient already assigned is shown as selected.
- Switch between the Primary recipient and Cc recipients tabs as needed - selections made on one tab are kept until the selector is saved or cancelled.
- Review the list:
- If the blueprint has default recipients configured, these are resolved from the visit and patient data and listed first, without loading the full address book.
- Selected recipients always appear at the top; the rest of the list follows alphabetically.
- Each recipient shows their name, role and address.
- To find someone else, type a name or part of an address into the field Search address book. If there's no match, a "no results" message is shown.
- Select a recipient:
- On Primary recipient, each recipient has a radio button - only one can be selected, and selecting another replaces the previous choice.
- On Cc recipients, each recipient has a checkbox - select as many as needed, with no upper limit.
- To remove a selected recipient, untick it (CC) or choose a different one (primary).
- Click Save to apply the changes, or Cancel (or close the selector) to discard them.
=> The To and CC fields update with the saved recipients, and the CC count indicator updates accordingly.
If the recipient or address book data fails to load, an error message is shown instead, and the previously saved recipients remain assigned.
Add a free text recipient
If the recipient needed isn't in the address book, it can be added as free text.
- In the recipient selector, on either tab, click + Add free text recipient.
=> The dialog box Add free text recipient opens, with the note: "Please note: Text entered here will appear on the task and may contain an address. Ensure it complies with legal and policy requirements."
- Enter the recipient's details as a single text entry. Save stays disabled until something other than spaces has been entered.
- Click Save.
=> The entry is added as a selected recipient, depending on which tab it was opened from:
- On the Primary recipient tab, the free text entry becomes the selected primary recipient, replacing any previous selection.
- On the Cc recipients tab, it's added to the selected CC recipients, alongside any existing ones.
A free text recipient is shown as plain text, exactly as entered - it has no role or address, and no structured recipient card.
Click Cancel in the dialog box to discard the entry without affecting the selector.
Edit or remove a free text recipient
Free text recipients can still be changed, as long as the document hasn't been approved yet.
- In the selector, a free text recipient is listed with its own Edit action (address book recipients don't have this).
- Click Edit to open the Edit free text recipient dialog, pre-filled with the saved text; change it and click Save.
- To remove a free text CC recipient, untick it; to replace a free text primary recipient, select a different one instead.
- Click the X on the recipient in the To or CC field to remove it directly, without opening the selector.
As with any other recipient change made in the selector, updates only apply to the document once Save is clicked there.
Approve a document with recipients
- Click Approve.
=> The approval modal lists the assigned recipients:
- The primary recipient is shown first, labelled Primary recipient.
- Any CC recipients follow in alphabetical order, each labelled CC recipient.
- If only a primary or only CC recipients are assigned, just that part is shown.
- If none are assigned, no recipient list appears and approval continues as normal.
- Choose Send to editor or Approve as usual, or Cancel to leave the document and its recipients unchanged.
=> Once a document is approved, its recipients become final: the To and CC fields turn read-only, and recipients can no longer be added, removed or edited - including free text ones. Later changes to a recipient's details, or to the blueprint, workflow or recipient configuration, do not affect an already-approved document.
The recipients selected in Scribe are also passed to the T-Pro web platform when the document is approved, to pre-populate the corresponding letter; changes made on the platform afterwards are not reflected back in Scribe.
Additional notes
- CC recipients added in Scribe are ignored on approval if the matching platform blueprint has no CC recipients configured.
- If an admin turns on the Disable Free Text Recipient Entry facility setting, the
+ Add free text recipient link no longer appears, and any free text recipient already on an unapproved document is removed automatically the next time it's opened. - All other approval behaviour - workflow routing, confirmation messages, and any pop-ups specific to the workflow - stays as before.
If you have any more queries, please do not hesitate to contact our Helpdesk or support@tpro.io.
© 2026